
We all know that people are attracted to pictures. I mean why else would Instagram be the social network behemoth that Facebook purchased in 2012 for $1 billion? And don’t get me started with Pinterest, Flickr, and many other photo-sharing sites out there.
The power of the visual medium cannot be overstated. This can be said in real estate. The very first things that potential homebuyers look at upon stumbling at your listings website are your properties’ photos.
You may have done your homework to pepper your listing with proper keywords and even gone the extra mile by running banner advertisements, but all this will prove useless if your property’s photos are terrible. Potential buyers will only click the back button as fast as they have clicked the link to your site. Whether you’re a broker or a seller, making a big first impression is imperative, and sometimes it’s the only opportunity you have to capture the attention of a potential homebuyer.
But you do not have to be of the same caliber as Mario Testino or Annie Leibovitz to come up with amazing photos. These useful yet simple tips from professional photographers will turn an otherwise drab photograph into something that’s magazine-worthy.
1. Get Proper Equipment
Although top-of-the-line equipment is not necessary, your iPhone won’t cut either. A decent equipment, such as a 10-megapixel point-and-shoot with smart features, can do the trick. You can change the settings in these types of cameras to allow you to take pictures anytime of the day. Some of these cameras can even take videos (which will be handy if you want to upload a video of your listing on YouTube). Buying a tripod is also a good idea—though it’s not a requirement—as it helps you from ending up with blurry pictures due to a shaky hand.
2. Be Mindful of What You’re Taking
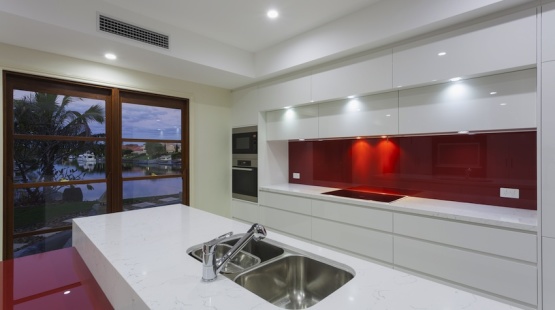
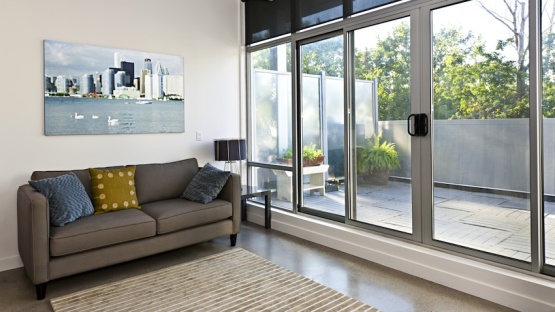
When people look at your listing, they want to see the house or condo being advertised and not what’s in it. Hence, make sure that the place is free of clutter and reasonably clean before you take its pictures. However, not all clutter is useless: Try to incorporate a dash of color, especially if the house is neutrally colored. Props such as brightly colored artworks and interesting vases can make an interesting contrast to an otherwise neutral room.
3. Aim for Brightness
Natural light is a professional photographer’s best friend, so try to schedule the shoot on a sunny day if possible. Open the curtains or blinds and let shafts of sunlight come in as they create a friendly mood. For a warmer tone, take interior photos at twilight, when the light coming through windows better matches the interior levels.
4. Take Your Time
Because every room looks best at different time of day, devote at least an entire day to the pictures. Rooms whose windows face east may look best during the morning, while a house will look warmer and more inviting when its picture is taken at dusk and when all lights are turned on.
5. Interior
A room always looks better when its photograph is taken from the doorway looking into it. If it’s empty, bring in a prop such as an interesting chair or capture rooms that are together, such as a master bedroom and bathroom, to make the image more interesting. Also, opt for shooting two walls only, with a bit of floor and ceiling, as shooting three walls creates a shoebox effect.

6. Exterior
If you are taking the picture of the house from outside, schedule the shoot at dusk and keep the sun behind you shining on the house’s front entrance. However, if the house faces north and is always in the shade, shoot it on a partly cloudy day to lower the contrast. Also, exterior pictures of single-detached homes look better if shot from an angle instead of taking its picture head on, to avoid getting a flat, two-dimensional shot.
7. Take Tons of Photos
A no-brainer—this lets you pick and choose the ones that look best. And that’s one advantage of today’s digital cameras and online listings: pictures are saved in your hard drive and there are no printing costs involved. You only need to upload files to a content management system, and most of the time, listings sites give you so much freedom as to how many photos you can include.
Given the sheer volume of listings sites out there, your property will just drown in a sea of generic ones if your listing is not executed properly. You need to stand out and one effective way to achieve this is to use professional-looking photos. After all, you spend tons of time perfecting your selfies so your Facebook friends and Instagram followers will bother looking at them. Why would your listing’s photos be any different?
Like What you've read?
-
milotimbol
-
Zipporah Antonio
-